Don’t Underestimate Auto Features In Photoshop
I recently had 2 rolls of film developed that were shot on the brand-new-to-me Pentax Spotmatic. Sadly, I underexposed most of the shots, and they look terrible.

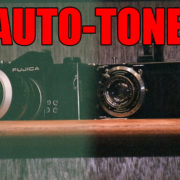
Raw Film shot of Two Cameras on a Shelf
As you can see, this photo is pretty awful and crazy washed out. I started playing with Photoshop as per usual, using the Camera Raw Filter, trying various curves and levels. The results weren’t too much better. Out of just random desperation, I hit “Auto Tone” from the Image menu.

Photoshop Auto Tone Menu Option
And look at that instant result!

Edited Film shot of Two Cameras on a Shelf
With one click Photoshop did a vastly better job than I was getting with 10 to 15 minutes of playing. It managed to get rid of the haze, adjust the levels, and get everything pretty much perfect, instantly. Going through the rolls, almost every picture was improved by this to the point I didn’t need to do any additional editing. The effect isn’t perfect though, shots that are too far gone can’t be saved, such as this one.

Raw and Auto Tone side by side.
As you can see, it does remove the usual green haze, but because the exposure was so low, the image just becomes awash with noise. It’s certainly improved, but by no means does it magically fix the image. More work might be able to be done however.
The best part about this discovery is that Auto Tone in Photoshop by default has a keyboard shortcut, so you can just drop your image in, do Ctrl + J to duplicate the layer, and then Shift + Ctrl + L and BOOP, your image is fixed, and you can toggle the layer on and off the see the before and after. Also don’t ignore the Auto Contrast and Auto Color options, some images work better with those.

Side by side of Raw, Auto Tone, and Auto Color
Quickly becomes its own subset of Instagram-esque filters, and we aren’t even using LUTs!
While I certainly don’t recommend falling into the laziness of just hitting auto, sometimes you want or need a quick fix, or at least a way to make the photo look like how you imagined it would turn out from the camera. The the appeal of film in this digital age is the limitations, which can also be its biggest downfall. At least I know how to quickly get these one-of-a-kind treasures to be decent, displayable images.